

Saturday, April 25, 2009
update #11 (sneaky peeky)
Always wanted to do this, but decided to make it top priority on my designs-to-do list because of popular demand.
Thursday, April 23, 2009
update #10 (the world)


 So I had a group project in my 3D design class and the assignment was to create an inflatable demonstrating volume. The form didn't have to be intricate, but it did have to be interesting to look at. I was surprised at how well my group worked and how everyone did their part. The initial idea was achieved as a group, but I found myself leading the group later down the road and coordinating what had to be done, making the key decisions, figuring out how things would work out, drawing out plans, and so forth. I might have been the mind behind the creation, but I wouldn't have been able to complete the project by the deadline if it weren't for my team.
It was interesting working on the inflatable in my garage due to the limited space and constantly having to walk around the van whenever I wanted to look at the other side since it completely blocked the garage. The inflatable wasn't even able to reach it's maximum size. This is probably the largest thing I've ever worked on.


 The world, to-go! This is the inflatable strapped to a box fan and a bottom stand. According to the plan I had in my head, the box fan would lay flat with the inflatable strapped on top and when the fan is turned on the inflatable will balloon upward and out; The fan will be totally hidden under the inflatable, thus making it more aesthetically appealing. I have yet to test it out though... so... yea, not 100% sure it will go as planned.
UPDATE: It works!!!!!

I like how it sways and slightly rolls on its side in the wind; it looks like it has a life of its own.
Monday, April 20, 2009
Kinship at Teefury!


I wanted to give everyone an early heads up! I have another shirt design being sold at Teefury.com! The sale will start on April 23rd at around 9pm (pacific time) and end on April 24th at around 8-9pm.
My shirt will only be available during the 24 hours, so be there or be square ;)
update #9 (multiples)
Here's my completed 3D design project I did with the plaster! I just recently found the time to re-set up this sucker so that's why it took me awhile to post pictures.


I decided to incorporate all my broken figures into the whole composition. A total of 51 figures. I think it looks nice :)


I decided to incorporate all my broken figures into the whole composition. A total of 51 figures. I think it looks nice :)
Monday, April 13, 2009
update #8 (take flight)
So here's the finished design I've been working on!

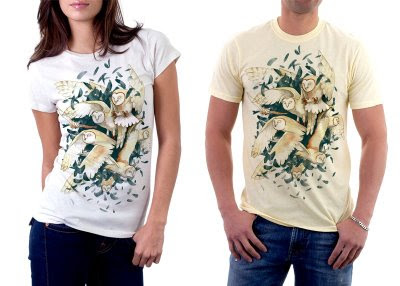
I find it hard to call it finished because it doesn't really look finished in my eyes. I can probably push the design some more, for example: adding more detail to the feathers so there's something more than just watercolor/ink washes, or just adding more linework in general. Also, some of the owl poses seem very unnatural, as if the owls posed in that position just for the sake of the design. I'm most likely going to redraw the entire design and make at least a couple of the owls look like they're just randomly flying around and not just posing, maybe even have one owl experiencing some turbulence while flying with the group; something to make the design more realistic. I'm also feeling that the design is lacking epic-ness, for lack of a better term. Also, it would be nice if I actually drew a feather to replace each and every brushstroke I used for the background of the design.


I find it hard to call it finished because it doesn't really look finished in my eyes. I can probably push the design some more, for example: adding more detail to the feathers so there's something more than just watercolor/ink washes, or just adding more linework in general. Also, some of the owl poses seem very unnatural, as if the owls posed in that position just for the sake of the design. I'm most likely going to redraw the entire design and make at least a couple of the owls look like they're just randomly flying around and not just posing, maybe even have one owl experiencing some turbulence while flying with the group; something to make the design more realistic. I'm also feeling that the design is lacking epic-ness, for lack of a better term. Also, it would be nice if I actually drew a feather to replace each and every brushstroke I used for the background of the design.
Saturday, April 11, 2009

Sunday, April 5, 2009
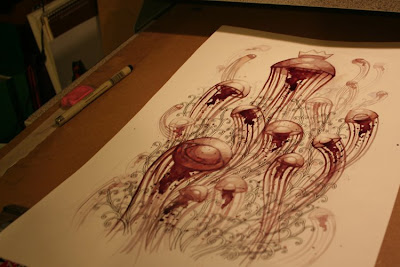
update #6 (warm up)
I wanted to start on some new designs today, but was afraid to jump straight into a design without warming up on my ink and brush skills. My warm up took a little longer than expected and I ended up drawing something neat.
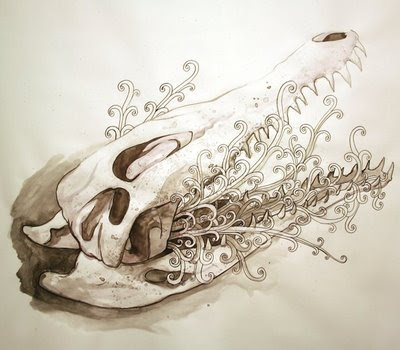
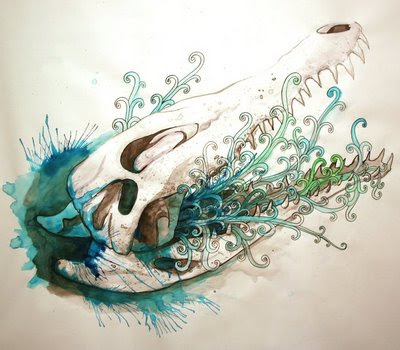
I apologize for the low quality images that I took with my camera. I wish I had a big scanner for larger works like this... but that would cost moolah and space. At least I don't have to worry about jumping into my designs tomorrow.


I apologize for the low quality images that I took with my camera. I wish I had a big scanner for larger works like this... but that would cost moolah and space. At least I don't have to worry about jumping into my designs tomorrow.
Friday, April 3, 2009
update #5 (plaster casting)

I've been really busy with school lately, but now I can finally relax and get some art done! So basically I've been working on my 3D design project non-stop. Remember that little four-legged bugger I made out of clay? I made a silicone mold of him and have been casting copies out of plaster for about two weeks now.
 My work station/garage
 (1) pour wet plaster into mold and wait for it to set
 (2) gently take top mold off
 (3) gently remove both bottom molds and then
touch up figure by trimming off seams.
(4) wash mold. Put mold back together and repeat.
 this is only a handful... I have more.
Subscribe to:
Comments (Atom)

